DIY Canvas Art: Utilizing Adult Coloring Books
If you enjoy adult coloring, you probably have some books sitting around. After a page is colored, you may have the thought, now what? It's easy to leave it sitting in the book or stick it in a frame, but why not try something more creative to display your favorite pieces?
Today I will share with you a simple, step-by-step tutorial on how to mount a coloring page onto a canvas. This tutorial can also work for other decorative papers, so it is not limited to just coloring pages. Once your page has been mounted, you can use it as home or office decor, or as a fun, personalized gift for a friend. This is an easy way that individuals of all skill levels can make beautiful, personalized art.
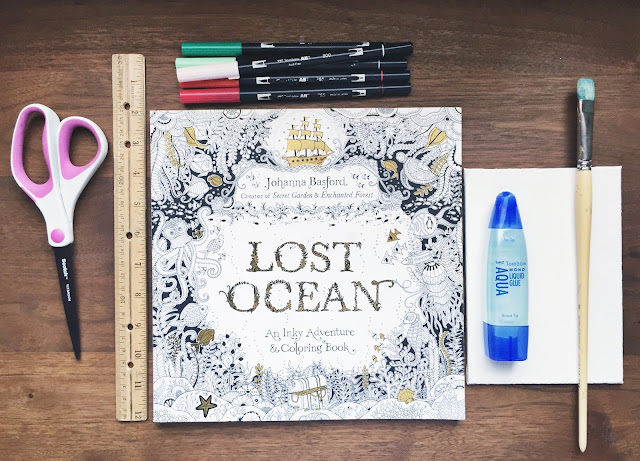
My supplies include: a coloring book (for this craft I used the Lost Ocean book), ruler, pencil, scissors (optional: paper cutting board), canvas panel (I used a Blick Studio Canvas Panel size 5x7"), Tombow MONO Aqua Liquid Glue, a paint brush with firm bristles, and a heavy book for weighting the canvas.
Step One: Select a coloring page or decorative paper to mount. For this example, I used a page I had colored previously with markers. I love using Tombow's Dual Brush Pens for coloring. The brush tip can be used for both broad strokes over larger areas and small details. Plus the fine tip is great for small details and thin lines. Using these markers will also give you bright, vibrant colors.

Step Two: Remove the page from the coloring book. You can either cut out the page or tear it out. Before tearing, loosen up the binding by pressing it open. Loosen the individual page by bending it back and forth. Pull gently along the seam to remove. If you choose to cut the page out, you may want to use a blade cutter like an X-Acto Knife to get a cut close to the binding.


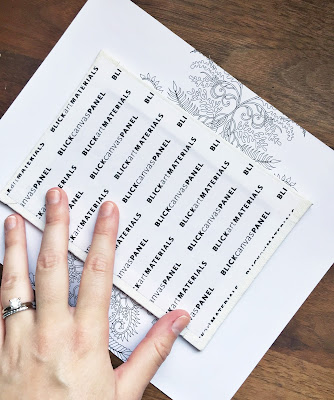
Step Three: Measure and trim the page to correspond to your canvas size and shape. Make sure to account for the depth of your canvas so that the paper can wrap around the entire edge and onto the back. I recommend giving yourself an extra inch to inch and a half of paper on each side. In some cases you may not need to trim the page at all.

For this 5x7" canvas panel, I measured a 1 1/2 inch border on all edges. I marked the border with a pencil, then folded along the pencil mark to make a guideline to cut along.


If you have a cutting board, you may want to use it to get a quick, straight cut.
Step Four: Apply glue to the entire canvas. I used Tombow MONO Aqua Liquid Glue. It's acid-free and great for use with paper crafting. It has two applicators, a broad tip and a pen tip, which work well for this craft.

Using the broad tip, apply a large drop of glue to the canvas. Use the paintbrush to spread a thin layer of glue across the entire canvas, all the way to the edge. If your canvas has more depth to it than my panel canvas, wait to apply glue to the edges until after you have glued the paper to the front of the canvas.


Step Five: Lightly place the paper on the canvas. Place the canvas, glue side down, on the back of the page. You may also find it helpful to hold the canvas and paper up to a light source before pressing it down. The back light will help you make sure you are happy with the placement of the paper on the canvas. Re-position as needed.

Step Six: Firmly press the paper onto the canvas, working from the center of the canvas to the outside edges. Smoothing it from the center out will help dispel any air bubbles that may exist between the paper and the canvas.

If you are working with a canvas panel, you can rub it firmly along the edge of a table to help get rid of any air bubbles and adhere the paper to the canvas. Work from the center out in each direction, pressing down firmly.

Step Seven: Glue down the borders of the page onto the back of the canvas. I glued down the long, side edges first. If your canvas has depth, apply glue to the edges of the frame before gluing the paper to the back. (Apply the glue around the entire edge and press down the paper like you did in step six.) Apply a line of glue to the back of the canvas along the edge (the pen tip on the Tombow glue bottle works well for this step).

Pull the border of the page tight and fold it over onto the back of the canvas. Press it down from the outer edge of the canvas moving toward the center. This will help move the glue out under the border of the paper.

After I glued down both long edges, I gave the glue time to set by placing a book on top for a few minutes.

Next, you will need to glue and wrap the bottom and top edges of the paper. First, cut off some of the excess paper from the long edge border. This will give you less paper bulk as you are folding the paper over the canvas. Cut diagonally from the edge of the canvas to the corner of the paper as shown below.

Then, fold the corners in, like you would if you were wrapping a gift.

Prepare the borders by folding and creasing them over the back of the canvas. This will make them easier to fold over once glue is applied.

Apply glue to the edges of the top and bottom borders, including along the diagonal edges. Pull the border of the page tight and fold it over onto the back of the canvas. Press down firmly for a minute to two as the glue sets.


You may want to place a book on top of the canvas again to allow more time for the glue to dry. While it's drying, don't forget to wash your paintbrush with soap and water to get the glue out of the bristles.
Once the glue is dry, your canvas is done and ready for display or gifting. This is also a great option for making inexpensive seasonal art pieces, decor for a child's room, or unique pieces for a gallery wall.


The photo above shows another piece of canvas art I made with decorative map paper. The canvas I used for this piece was stretched over a wooden frame, giving it some depth for the paper to wrap around.

If you create a piece of canvas art, I would love to see it. Share it on Instagram and tag @elm_creative, or you can send it to me directly via email.
Today I will share with you a simple, step-by-step tutorial on how to mount a coloring page onto a canvas. This tutorial can also work for other decorative papers, so it is not limited to just coloring pages. Once your page has been mounted, you can use it as home or office decor, or as a fun, personalized gift for a friend. This is an easy way that individuals of all skill levels can make beautiful, personalized art.

DIY Canvas Art
My supplies include: a coloring book (for this craft I used the Lost Ocean book), ruler, pencil, scissors (optional: paper cutting board), canvas panel (I used a Blick Studio Canvas Panel size 5x7"), Tombow MONO Aqua Liquid Glue, a paint brush with firm bristles, and a heavy book for weighting the canvas.
Step One: Select a coloring page or decorative paper to mount. For this example, I used a page I had colored previously with markers. I love using Tombow's Dual Brush Pens for coloring. The brush tip can be used for both broad strokes over larger areas and small details. Plus the fine tip is great for small details and thin lines. Using these markers will also give you bright, vibrant colors.

Step Two: Remove the page from the coloring book. You can either cut out the page or tear it out. Before tearing, loosen up the binding by pressing it open. Loosen the individual page by bending it back and forth. Pull gently along the seam to remove. If you choose to cut the page out, you may want to use a blade cutter like an X-Acto Knife to get a cut close to the binding.


Step Three: Measure and trim the page to correspond to your canvas size and shape. Make sure to account for the depth of your canvas so that the paper can wrap around the entire edge and onto the back. I recommend giving yourself an extra inch to inch and a half of paper on each side. In some cases you may not need to trim the page at all.

For this 5x7" canvas panel, I measured a 1 1/2 inch border on all edges. I marked the border with a pencil, then folded along the pencil mark to make a guideline to cut along.


If you have a cutting board, you may want to use it to get a quick, straight cut.
Step Four: Apply glue to the entire canvas. I used Tombow MONO Aqua Liquid Glue. It's acid-free and great for use with paper crafting. It has two applicators, a broad tip and a pen tip, which work well for this craft.

Using the broad tip, apply a large drop of glue to the canvas. Use the paintbrush to spread a thin layer of glue across the entire canvas, all the way to the edge. If your canvas has more depth to it than my panel canvas, wait to apply glue to the edges until after you have glued the paper to the front of the canvas.


Step Five: Lightly place the paper on the canvas. Place the canvas, glue side down, on the back of the page. You may also find it helpful to hold the canvas and paper up to a light source before pressing it down. The back light will help you make sure you are happy with the placement of the paper on the canvas. Re-position as needed.


Step Six: Firmly press the paper onto the canvas, working from the center of the canvas to the outside edges. Smoothing it from the center out will help dispel any air bubbles that may exist between the paper and the canvas.

If you are working with a canvas panel, you can rub it firmly along the edge of a table to help get rid of any air bubbles and adhere the paper to the canvas. Work from the center out in each direction, pressing down firmly.

Step Seven: Glue down the borders of the page onto the back of the canvas. I glued down the long, side edges first. If your canvas has depth, apply glue to the edges of the frame before gluing the paper to the back. (Apply the glue around the entire edge and press down the paper like you did in step six.) Apply a line of glue to the back of the canvas along the edge (the pen tip on the Tombow glue bottle works well for this step).

Pull the border of the page tight and fold it over onto the back of the canvas. Press it down from the outer edge of the canvas moving toward the center. This will help move the glue out under the border of the paper.

After I glued down both long edges, I gave the glue time to set by placing a book on top for a few minutes.

Next, you will need to glue and wrap the bottom and top edges of the paper. First, cut off some of the excess paper from the long edge border. This will give you less paper bulk as you are folding the paper over the canvas. Cut diagonally from the edge of the canvas to the corner of the paper as shown below.

Then, fold the corners in, like you would if you were wrapping a gift.

Prepare the borders by folding and creasing them over the back of the canvas. This will make them easier to fold over once glue is applied.

Apply glue to the edges of the top and bottom borders, including along the diagonal edges. Pull the border of the page tight and fold it over onto the back of the canvas. Press down firmly for a minute to two as the glue sets.


You may want to place a book on top of the canvas again to allow more time for the glue to dry. While it's drying, don't forget to wash your paintbrush with soap and water to get the glue out of the bristles.
Once the glue is dry, your canvas is done and ready for display or gifting. This is also a great option for making inexpensive seasonal art pieces, decor for a child's room, or unique pieces for a gallery wall.


The photo above shows another piece of canvas art I made with decorative map paper. The canvas I used for this piece was stretched over a wooden frame, giving it some depth for the paper to wrap around.

If you create a piece of canvas art, I would love to see it. Share it on Instagram and tag @elm_creative, or you can send it to me directly via email.


Comments
Post a Comment