DIY Novelty Crayons [Feat. Han Solo]
I don't know about you, but I am so excited for the latest Star Wars story installment, Solo, to release tomorrow! I feel like the newest set of films have been getting better and better, so I can't wait to see what's next. If you're also a Star Wars fan, then you'll love this craft!
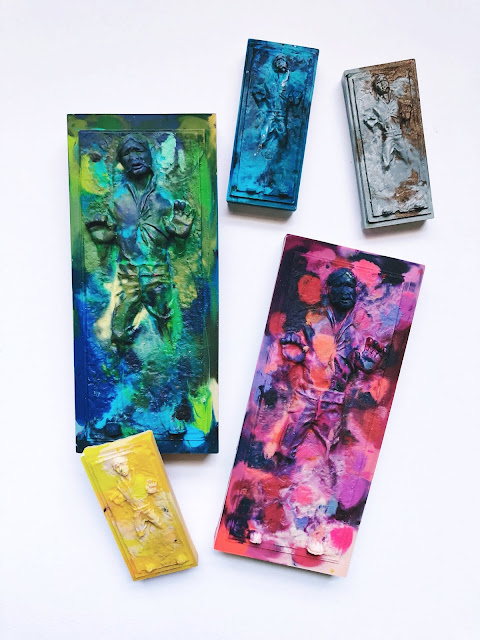
Today I'll tell you how to make your own novelty crayons, and in anticipation of Solo, these crayons are none other than Han Solo frozen in carbonite! These DIY crayons can be a fun craft for kids (with adult assistance), or can even serve as a unique party favor or gift. They don't have to be Star Wars-themed, any silicone mold shape will work.
Step One: Preheat oven to 300 degrees. Depending on the size of your molds, it will take anywhere between 10-20 minutes to sufficiently melt the wax.

Step Two: Prepare crayons and place in mold. As I mentioned above, I cut slices of the crayons to make sure I could fit a variety of colors in the smaller molds. For larger molds, bigger broken pieces of crayon will work fine.

How you mix your colors is completely up to you. You can do one or two colors per mold, or mix it up with lots of different colors. For my craft, I chose a wide variety of complementary colors. Make sure to fill each mold as full as possible. The more wax, the less likely your crayon is to crack upon removal from the mold.

If you find that your crayon has cracked, you can place it back in the mold, add some more crayon pieces, and melt again.

Step Three: Melt crayon wax in oven. Place the mold on a sheet pan to give it stability and to make it easier to remove from the oven. For my smaller molds, it took around 10-12 minutes to sufficiently melt the wax. For the larger mold, it took 15-18 minutes. The crayon pieces don't have to be completely liquefied, just enough to fill in the edges and details of the mold. However, if you do want them completely liquefied, leave your mold in the oven a little longer.

Step Four: Remove from oven and swirl wax with tooth pick or dowel rod. You can swirl your colors as much or as little as you prefer. The more you swirl, the more blended your colors will become. If you run the dowel along the bottom of the mold, this will help swirl the colors that will be on the top of your crayon.
Step Five: Let wax cool completely before removing from mold. To remove, you may find it helpful to run your mold under warm water, especially if the wax is not releasing easily. I loosened all edges of the mold before pressing on the bottom of the mold to release the crayon. Again, if a crayon cracks, you can always re-melt with additional wax. The more wax, the stronger your crayon will be.

Step Six: Enjoy! Have fun with your new novelty crayons! You can use a craft knife to trim off rough edges or to carve your crayon into a new shape.

Today I'll tell you how to make your own novelty crayons, and in anticipation of Solo, these crayons are none other than Han Solo frozen in carbonite! These DIY crayons can be a fun craft for kids (with adult assistance), or can even serve as a unique party favor or gift. They don't have to be Star Wars-themed, any silicone mold shape will work.
DIY Novelty Crayons

My supplies include: Crayons, silicone mold, small sheet pan, and small dowel rods or tooth picks. If you have old, broken crayons, these will work great. For my craft, and because some of the molds were smaller, I cut the crayons with a small craft knife.
Step One: Preheat oven to 300 degrees. Depending on the size of your molds, it will take anywhere between 10-20 minutes to sufficiently melt the wax.

Step Two: Prepare crayons and place in mold. As I mentioned above, I cut slices of the crayons to make sure I could fit a variety of colors in the smaller molds. For larger molds, bigger broken pieces of crayon will work fine.

How you mix your colors is completely up to you. You can do one or two colors per mold, or mix it up with lots of different colors. For my craft, I chose a wide variety of complementary colors. Make sure to fill each mold as full as possible. The more wax, the less likely your crayon is to crack upon removal from the mold.

If you find that your crayon has cracked, you can place it back in the mold, add some more crayon pieces, and melt again.

Step Three: Melt crayon wax in oven. Place the mold on a sheet pan to give it stability and to make it easier to remove from the oven. For my smaller molds, it took around 10-12 minutes to sufficiently melt the wax. For the larger mold, it took 15-18 minutes. The crayon pieces don't have to be completely liquefied, just enough to fill in the edges and details of the mold. However, if you do want them completely liquefied, leave your mold in the oven a little longer.

Step Four: Remove from oven and swirl wax with tooth pick or dowel rod. You can swirl your colors as much or as little as you prefer. The more you swirl, the more blended your colors will become. If you run the dowel along the bottom of the mold, this will help swirl the colors that will be on the top of your crayon.
Step Five: Let wax cool completely before removing from mold. To remove, you may find it helpful to run your mold under warm water, especially if the wax is not releasing easily. I loosened all edges of the mold before pressing on the bottom of the mold to release the crayon. Again, if a crayon cracks, you can always re-melt with additional wax. The more wax, the stronger your crayon will be.

Step Six: Enjoy! Have fun with your new novelty crayons! You can use a craft knife to trim off rough edges or to carve your crayon into a new shape.


Comments
Post a Comment